Tuesday, January 20, 2015

Reset Lost Windows Password with UBCD4Win Live CD

In this tutorial we'll show you how to reset lost Windows password with the freeware UBCD4Win - Ultimate Boot CD for Windows.

Note: UBCD4Win is a freeware so don't expect it to work with domain controllers. If you want to find a more powerful yet easy-to-use password recovery software, try the PCUnlocker Live CD.

Part 1: Create A UBCD4Win Live CD
  1. Download the freeware UBCD4Win from its official website. The download is pretty big (about 269Mb), so expect to wait a while if your network connection is slow.
  2. After installing, start the UBCD4Win (UBCD4WinBuilder.exe) program. Point the "Source" path to your Windows XP setup CD or Windows 2003 installation CD. However, Vista is not yet supported as a source. UBCD4Win-PE-Builder
  3. Insert a blank CD, select "Burn to CD/DVD" and click Build. The whole process will take a little while.
Part 2: Reset Lost Windows Admin Password
  1. Once the CD has been created, go to the BIOS and make sure your CD-ROM is set as the first boot device. Start up the computer with UBCD4Win in the CD-ROM and you will have some boot options. Choose the "Launch The Ultimate Boot CD for Windows" option. ubcd4win-boot-menu
  2. It will take a few minutes to load fully, but when it does you should see a Windows XP like interface. Once there, go to Start > Programs > Password Tools > NTPWEdit. ubcd4win
  3. Once the utility is open, you need to click the (Re)open button to open up the SAM file which should show you the list of local system accounts for your Windows installation. Select the Administrator account and click on Change Password. nwpwedit
  4. Type your new password twice, or leave the password fields blank if you want to clear the password. Click OK. change-admin-password
  5. Restart the computer, remove the UBCD4Win Live CD from the drive, and you should be able to log into Windows administrator account with the new password you've set.

Saturday, January 3, 2015

Decrypt Facebook Password Stored in Your Web Browser

Having your Web browser remember your Facebook password can be convenient, but sometimes you may forget the password and want to view cached password in your browser. With Password Recovery Bundle you can decrypt website passwords stored in most common web browsers, including Google Chrome, Firefox, Internet Explorer, Apple Safari, Opera, Flock, SeaMonkey and Avant Browser. Here is how to use the program to reveal Facebook passwords stored in your web browser.

How to Decrypt Facebook Passwords Stored in Your Web Browser?

Download and install Password Recovery Bundle on your computer. After installing, start the program and then click on Start Recovery.


As soon as you click on the Start Recovery button, you'll see a drop-down list that displays all supported passwords. From there you need to choose the corresponding option for your Web browser. For example, you have to choose Chrome Password option if your Facebook password is remembered by Google Chrome.


The program will quickly decrypt and reveal all your website passwords along with Facebook login cached in your selected Web browser.

Sunday, December 21, 2014

PXE Booting Your PC to Reset Forgotten Windows Password

Forgot Windows administrator password and locked out of your PC? Most of Windows password recovery tools require you to create a bootable disc for cracking a password, but what do you do if you don't have a blank CD or USB stick in hand? This tutorial will show you how to boot your locked PC directly over Network Interface Card (NIC), so you can then reset forgotten Windows password without using a CD or USB drive.

PXE works with Network Interface Card (NIC) of the system by making it function like a boot device. Nearly every modern Windows PC has a BIOS which supports PXE booting. Just put the PCUnlocker Live image on a PXE server, you can then boot any other PC/netbook on the same LAN network to use PCUnlocker for resetting a lost Windows password!

Check out this article for detailed instructions:
Windows Password Recovery Using PXE Network Boot

Monday, December 8, 2014

Create A Bootable External Hard Drive to Install Windows 8

Is it possible to install Windows 8 from an external hard drive? With the freeeare ISO2Disc you can make a installation CD/USB from Windows 8 ISO image. However, what to do if you don't have a CD or USB drive in hand? This tutorial will explain how to create a bootable external hard drive from Windows 8 ISO image, and then install Windows 8 directly from external hard drive.

Part 1: Copy Windows 8 Installation Files to Hard Drive
  1. First connect your hard drive to another working computer as a slave/second drive.
  2. You need to copy the setup files from Windows 8 ISO to your hard drive. This can be done using the freeware 7-Zip. After installing 7-Zip locally, right-click on your Windows 8 ISO image and select 7-Zip -> Extract files.

    decompress-win8-iso-image
  3. Next you need to specify where the destination should be. Click button to select the root path of the attached hard drive. Click OK.

    7-zip-extract
  4. Now the extracting progress window will display.

    extracting-iso-image

    When this is done, the extraction dialog will automatically close. Now you've successfully copied all contents of Windows 8 ISO to your hard drive.

Part 2: Make External Hard Drive Bootable
  1. Open the Command Prompt with admin privileges. In Windows 7, go to Start > All Programs > Accessories. Right-click on Command Prompt and select Run as administrator.
  2. In the Command Prompt, type in the following commands, and press Enter key after typing each command.
    Diskpart
    List Disk
    Select Disk 1
    List Partition
    Select Partition 1
    Active
    Exit


    set-partition-active
    The commands above will set the first partition of your attached hard drive as active.
  3. Next type this command to mark your hard drive as bootable:
    e:\boot\bootsect.exe /nt60 e:

    set-partition-bootable
    Assuming that e: is the drive letter of attached hard drive, where the Windows 8 installation files are copied to.
  4. At this moment your external hard drive is bootable and you can then use it to install Windows 8. Close the Command Prompt and shutdown the computer.

Part 3: Install Windows 8

Place the hard drive back into the target machine. Make sure that the BIOS is configured to boot from the hard drive. If you did everything correctly, you should see the blue Windows logo and setup will load. Install Windows 8 as usual (but don’t format your hard drive this time otherwise it will erase the Windows 8 setup files too).

Monday, November 17, 2014

Windows 8 Password Recovery on ASUS Laptop

How to reset or bypass Windows 8 password on ASUS laptop that comes with UEFI? There are many bootable Live CDs out there (including Linux distro or BartPE) that could be used to reset Windows login credentials on traditional BIOS-based system. But if you try to boot UEFI-based computer from such a disc, you may get an incompatibility error saying "Reboot and Select proper Boot device or Insert Boot Media in selected Boot device and press a key"

If you couldn't find a UEFI compatible bootdisk, try the most powerful Windows password removal utility - PCUnlocker, a bootdisk based on Windows 8 PE which can boot in UEFI mode from either a USB flash drive or a CD. Here's our guide on how to reset Windows 8 password on ASUS laptop.

Part 1: Create A PCUnlocker Live CD/USB Drive
  1. Before resetting ASUS laptop password, you need to use another computer to make a PCUnlocker boot media. After you've downloaded the full version of PCUnlocker Enterprise (trial version), unzip it and you'll get a disc image file called pcunlocker.iso.
  2. Next download and install the freeware ISO2Disc. Run the ISO2Disc program, click on Browse button to select the PCUnlocker ISO image.
    Create a GPT bootable PCUnlocker USB drive
  3. To make a PCUnlocker Live CD, simply select Burn to CD/DVD and click on Start Burn. However, if you don't have a blank CD at hand, you can make a UEFI bootable USB drive: Choose your USB drive and select GPT partition style, and then click on Start Burn.
Part 2: Reset ASUS Windows 8 Password
  1. Plug the USB drive into a USB port of your locked ASUS Windows 8 laptop, or put the CD in the optical drive if you've created a Live CD.
  2. Turn on the computer and immediately press the F2, or Delete key repeatedly until the UEFI (BIOS) Setup screen appears. Since boot is extremely fast, I always need a few attempts to get inside.
    ASUS Boot Override
  3. In BIOS, go to the Save & Exit tab. Select your CD or USB drive under Boot Override and press Enter. The computer will automatically boot from your specified boot media.
  4. After one or two minutes, you'll see the PCUnlocker program that lists all of your existing Windows accounts. If you've set up a Microsoft account as your laptop's login, you can see the associated email address in the Description column.
    Reset Windows Password
  5. Choose a local account and then click Reset Password button, it will reset your forgotten local account password immediately. To unlock a Microsoft account, choose the associated local account and proceed. The program will assign a new password: Password123 to your MS account for logging on locally.
This method will also work for any other brands of computers that use the latest UEFI firmware.

Monday, November 10, 2014

How to Back Up the Registry in Windows 8/7/Vista

Windows Registry is a critical database that stores settings for everything on a Windows PC — from application settings, user passwords, device driver info, Windows settings, and pretty much everything else. A corrupt or damaged registry can cause your system crashes, freezes or unbootable. That is why we need to back up the registry regularly. In this article we'll show you how to back up the registry in Windows 8/7/Vista, using the bootable disc - PCUnlocker.

How to Back Up the Registry in Windows 8/7/Vista?

PCUnlocker comes as a self-extracting zip file which contains a bootable CD image. Download the program and unzip it locally. Burn the CD image to your CD with your favorite burning program or ISO2Disc.

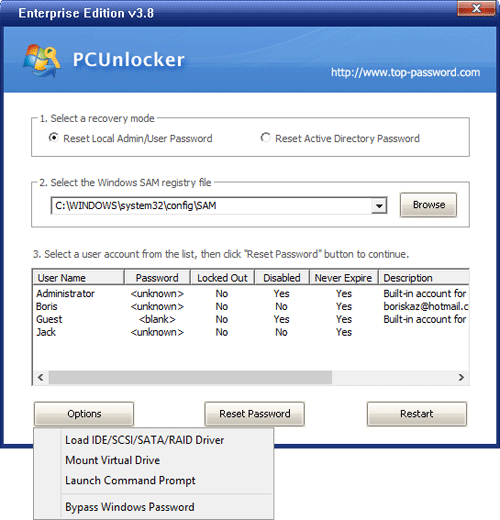
Boot your computer from the newly burned CD. After booting from the CD, you'll get to the PCUnlocker program. Despite this program is mainly designed for resetting lost Windows password, it can also be used to back up any files on your computer, including the registry.

Click on the "Option" button and select "Launch Command Prompt".


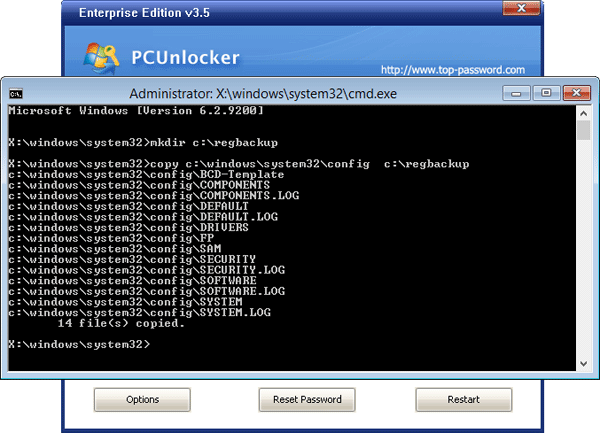
When the Command Prompt starts, run the following commands one by one:
mkdir c:\regbackup
copy c:\windows\system32\config c:\regbackup
This will create a backup folder and copy all your registry files to that folder.


In the event of registry corruption that prevents your computer from running, just boot to the PCUnlocker program and then restore your registry files by running this command:
copy c:\regbackup c:\windows\system32\config
Done! Now you know how to backup and restore Windows registry. This trick will come in handy before you make any major registry changes or install a software that might corrupt your system.

Tuesday, October 21, 2014

Reset Forgotten Windows 8.1 Password on ThinkPad 10 Tablet

How to unlock ThinkPad 10 tablet if you've forgotten your Windows 8.1 password? It's clearly an issue all of us have experienced at some point in time with varying degrees of importance and frustration. In this article we'll provide an easy way to reset forgotten Windows 8.1 password on ThinkPad 10 tablet.

First of all, you need to create a bootable PCUnlocker USB drive on another PC you have access to. Boot your ThinkPad 10 tablet from the USB drive and it enables you to reset forgotten Windows 8.1 admin/user password easily. Here are step-by-step instructions.

Note: PCUnlocker Enterprise supports both 32-bit UEFI and 64-bit UEFI. If your tablet comes with Windows 8/8.1 32-bit preinstalled, make sure you use the 32-bit distribution of PCUnlocker Enterprise. Otherwise you need to use 64-bit distribution instead.

How to Reset Forgotten Windows 8.1 Password on ThinkPad 10 Tablet?
  1. Download the zipped ISO image of PCUnlocker Enterprise program. After you've downloaded it, double-click the download file and your system will display all files inside the zip archive. Drag the pcunlocker.iso from there and save it on your desktop.
  2. Install ISO2Disc program and launch it. Click on Browse button to locate the ISO image you've downloaded, then choose the USB flash drive you've plugged in, select the GPT (required for UEFI boot) partition style. Click on Start Burn to create a bootable PCUnlocker USB drive.

  3. Plug the USB drive to your ThinkPad 10 tablet PC. When you turn on the tablet, press the power button together with the volume up button at the same time to enter the ThinkPad Setup program.
  4. Once into the BIOS screen, select Startup then Boot. Move your attached USB drive to the top of the bootable device list.
    thinkpad-tablet-bios
  5. Switch to the Security tab, disable the Secure Boot option. Press F10 to save your changes and then reboot.
    thinkpad-tablet-secure-boot
  6. After booting from USB drive, it will start the WinPE operating system inside the USB drive and eventually open up the PCUnlocker program. PCUnlocker automatically searches your Windows 8.1 installation and displays a list of Windows 8.1 user accounts on your ThinkPad 10 tablet.

  7. Choose a user account and click on Reset Password button. The program will reset your forgotten Windows 8.1 password immediately. Restart the tablet and remove the USB drive. You can then log into your ThinkPad 10 tablet without a password!