Forgot Windows administrator password and locked out of your PC? Most of Windows password recovery tools require you to create a bootable disc for cracking a password, but what do you do if you don't have a blank CD or USB stick in hand? This tutorial will show you how to boot your locked PC directly over Network Interface Card (NIC), so you can then reset forgotten Windows password without using a CD or USB drive.
PXE works with Network Interface Card (NIC) of the system by making it function like a boot device. Nearly every modern Windows PC has a BIOS which supports PXE booting. Just put the PCUnlocker Live image on a PXE server, you can then boot any other PC/netbook on the same LAN network to use PCUnlocker for resetting a lost Windows password!
Check out this article for detailed instructions:
Windows Password Recovery Using PXE Network Boot
Forgot Windows 8 Password? Recover, Bypass, Unlock and Reset Lost Windows 8 Password with Ease
Sunday, December 21, 2014
Monday, December 8, 2014
Create A Bootable External Hard Drive to Install Windows 8
Is it possible to install Windows 8 from an external hard drive? With the freeeare ISO2Disc you can make a
installation CD/USB from Windows 8 ISO image. However, what to do if you
don't have a CD or USB drive in hand? This tutorial will explain how to
create a bootable external hard drive from Windows 8 ISO image, and then install Windows 8 directly from external hard drive.
Part 1: Copy Windows 8 Installation Files to Hard Drive
Part 2: Make External Hard Drive Bootable
Part 3: Install Windows 8
Place the hard drive back into the target machine. Make sure that the BIOS is configured to boot from the hard drive. If you did everything correctly, you should see the blue Windows logo and setup will load. Install Windows 8 as usual (but don’t format your hard drive this time otherwise it will erase the Windows 8 setup files too).
Part 1: Copy Windows 8 Installation Files to Hard Drive
- First connect your hard drive to another working computer as a slave/second drive.
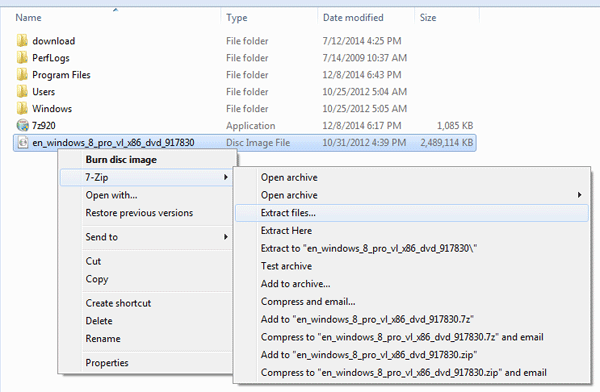
- You need to copy the setup files from Windows 8 ISO to your hard drive. This can be done using the freeware 7-Zip. After installing 7-Zip locally, right-click on your Windows 8 ISO image and select 7-Zip -> Extract files.

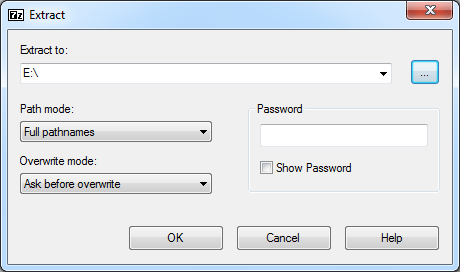
- Next you need to specify where the destination should be. Click … button to select the root path of the attached hard drive. Click OK.

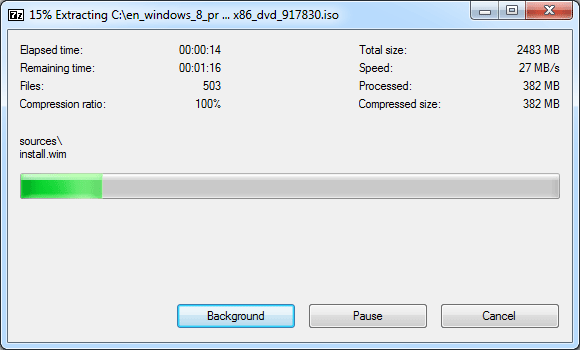
- Now the extracting progress window will display.

When this is done, the extraction dialog will automatically close. Now you've successfully copied all contents of Windows 8 ISO to your hard drive.
Part 2: Make External Hard Drive Bootable
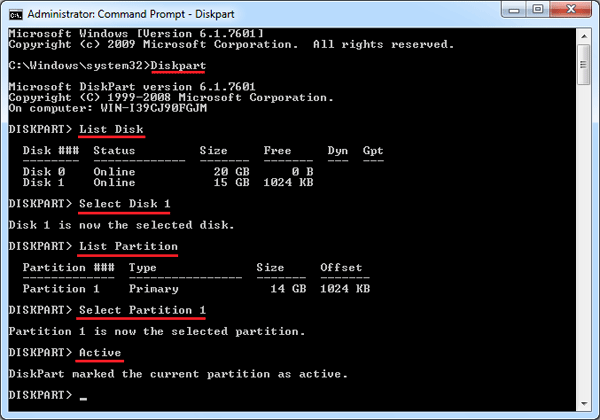
- Open the Command Prompt with admin privileges. In Windows 7, go to Start > All Programs > Accessories. Right-click on Command Prompt and select Run as administrator.
- In the Command Prompt, type in the following commands, and press Enter key after typing each command.
Diskpart

List Disk

Select Disk 1

List Partition

Select Partition 1

Active

Exit

The commands above will set the first partition of your attached hard drive as active. - Next type this command to mark your hard drive as bootable:
e:\boot\bootsect.exe /nt60 e:

Assuming that e: is the drive letter of attached hard drive, where the Windows 8 installation files are copied to. - At this moment your external hard drive is bootable and you can then use it to install Windows 8. Close the Command Prompt and shutdown the computer.
Part 3: Install Windows 8
Place the hard drive back into the target machine. Make sure that the BIOS is configured to boot from the hard drive. If you did everything correctly, you should see the blue Windows logo and setup will load. Install Windows 8 as usual (but don’t format your hard drive this time otherwise it will erase the Windows 8 setup files too).
Subscribe to:
Comments (Atom)