Saturday, June 6, 2015

How to Bypass Windows 8 Logon Screen without Knowing or Resetting the Password

Forgot your Windows 8 user password and can't bypass the logon screen? In this tutorial we'll show you a simple way to bypass Windows 8 logon screen without knowing or resetting the password.

Part 1: Create A PCUnlocker Live CD

  1. Download the full version of PCUnlocker via the link included in your order confirmation email. Unzip the downloaded file (self-extracting archive) and you'll get the pcunlocker.iso file.
  2. Download and install the free burning program ISO2Disc.
  3. Launch the ISO2Disc program. Click on Browse button to locate the PCUnlocker ISO image (pcunlocker.iso), then click on Start Burn to make a PCUnlocker Live CD (or USB drive).

    Burn ISO Image to CD/DVD or USB flash drive

Part 2: Boot from PCUnlocker Live CD

  1. Insert the PCUnlocker Live CD into your locked computer, then turn on or reboot your computer. When it is powered on, check the boot-screen for setup key (i.e. DELETE key, F8 key, F2 key) to enter BIOS Setup Utility.
  2. Use the arrow keys to select the BOOT tab, then change the Boot Device Priority: Set 1st Boot Device to CD/DVD-ROM.

    BIOS Setting
  3. Press F10 to save your changes. Now your computer will try to boot from CD or USB flash drive. If you still can't get your computer to boot from the CD/USB drive, please refer to this boot up troubleshooting guide.

Part 3: Bypass Windows 8 Logon Password

  1. After booting from the CD, the computer will load the WinPE operating system and then start the PCUnlocker utility.
  2. The program detects the SAM registry files for all valid Windows installations on your hard drive, and lists your Windows accounts. For dual-boot or multi-boot computer, make sure you choose the SAM file corresponding to the Windows installation where the password is to be bypassed.

    Reset Windows Password
  3. To proceed with password bypassing instead of resetting a password, click on the Options button and then select Bypass Windows Password from the drop-down list.

    Options
  4. When the confirmation dialog pops up, click OK to proceed.

    Bypass Windows Password
  5. The program is ready to bypass the Windows password authentication. Click OK and reboot the computer. Remove the CD so the computer will boot from your hard drive.

    Windows Password Bypassed
  6. When you come to the Windows login screen, simply type anything in the password box and you can log in to your local or Microsoft account! The next time you start the computer, the original password will be back, the temporary changes will be discarded and the system will behave as if nothing has happened.

Wednesday, May 13, 2015

How to Install Windows 8 without CD Key

Starting from Windows 8, a CD key (product key) is needed before proceeding with the installation, and you're unable to skip entering CD key. However thanks to a simple trick, you can easily skip the CD key during the Windows 8 installation process.  

How to Install Windows 8 without CD Key?

  1. Follow this guide to download a official copy of Windows 8 directly from Microsoft's servers.
  2. After you've downloaded the Windows 8 ISO image, burn it to a USB flash drive with the freeware ISO2Disc.
  3. Open your USB installation drive and navigate to the /sources folder. Look for the ei.cfg file and open it in a text editor such as Notepad. If the file doesn't already exist, create a new text document and rename it as ei.cfg.
  4. Copy and paste the following text into the ei.cfg file and then save it. Make sure that anything that already exists in the file should be cleared first.
    [EditionID]
    Professional
    [Channel]
    Retail
    [VL]
    1

    ei_cfg
  5. Now go ahead and boot from your USB installation media. This time you will see a Skip button when you are prompted to enter a product key during Windows Setup. 
This method will basically allow you to install Windows 8 as a trial for about 30 days without entering a Windows 8 CD key during the installation. If you have a valid product key later on, you can change Windows 8 product key after install.
 

Saturday, May 9, 2015

How to Disable Password Complexity Requirements in Windows Server Core

How can I disable the password complexity requirements in Windows Server Core? Because there is no GUI for accessing the Group Policy Editor, you have to do most of the work of configuring a Server Core installation by typing commands in the Command Prompt. In this tutorial we'll show you how to disable password complexity requirements in Windows Server Core.

If your server is a domain controller, follow the steps below and you can change the default domain password policy. To change the local password policy on a domain controller, you must boot your server in Directory Services Restore Mode (DSRM) and then perform the steps below:
  1. Open an elevated Command Prompt. If you've forgotten the local or domain administrator password and couldn't log on, try the PCUnlocker bootdisk for bypassing the password.
  2. Type the following command and hit Enter:
    secedit.exe /export /cfg C:\secconfig.cfg
    export-group-policy
    This will dump the local policy or domain policy for the system, including account policies, audit policies, and so on.
  3. Open the C:\secconfig.cfg file with your text editor. For Windows Server Core, you can type notepad.exe in the Command Prompt. When Notepad launches, click the File -> Open menu to open C:\secconfig.cfg.
  4. Now you can view and edit all of the relevant policies as shown below. Here we'll disable the password complexity policy, so replace PasswordComplexity = 1 to PasswordComplexity = 0, and change the value of MinimumPasswordLength to 0.
    edit-group-policy
  5. When done, save your changes. To load the edited file as your new policy configuration, use the following command:
    secedit.exe /configure /db %windir%\securitynew.sdb /cfg C:\secconfig.cfg /areas SECURITYPOLICY
    update-group-policy
  6. The new password policy will apply to all password changes and new password. After disabling the password complexity policy, you should be able to change Windows account password to whatever you like.

Tuesday, April 28, 2015

How to Run Windows 8 Directly from USB Drive

Windows To Go is a new feature in Windows 8 which allows you to install a portable version of Windows onto a USB drive, so we can run it from any computer we want. All you need is a USB 3.0 device with at least 13GB capacity (it will run on a USB 2.0 memory stick, but slowly), a copy of Windows 8/8.1 ISO image.

Part 1: Create Windows 8 To Go USB Drive 
  1. Download and install the freeware ISO2Disc on your computer.
  2. Plug in your external USB drive on the PC and launch ISO2Disc.

  3. Click on Browse button to select your Windows 8 or 8.1 ISO image. Please note that the program will format your external USB drive and delete its entire data, so it is always recommended taking a backup before you continue.
  4. Click on Burn to USB Flash Drive option and select your USB drive from the device list.
  5. Choose the GPT partition style if you want to create a UEFI bootable drive, or stick with MBR if you need to boot off a computer with a traditional BIOS.
  6. Under the Bootdisk Type, select "Windows to Go (install Windows to USB)".


  7. When you click Start Burn, it begins to install a portable version of Windows to your USB drive. This process can take a very long time if you use a USB 2.0 thumb drive. It's recommended to use an external USB mass storage device and this process can be done within about ten minutes.

Part 2: Boot from Your Portable USB Drive 

After creating, you can the portable version of Windows on whatever computer you want. To do so, just plug in the Windows To Go USB drive and set your USB device as the first bootable media from within the BIOS.

The first time it starts, it'll install the necessary drivers and take a while to boot, after which you can set up your machine just like you would a new Windows 8 PC. That's it!

Tuesday, April 7, 2015

How to Password Protect Windows Folders/Files

It's always a good idea to password protect your sensitive data. If you share your PC with coworkers, children or spouse, your private files might be under the threat of being reviewed. Lock My Folders allows you to create a secure folder that can only be opened or decrypted by others who know your password. The secure folder works like a vault, and Windows will automatically encrypt all files and subfolders in it.

How to Password Protect Windows Folders/Files?

Download 
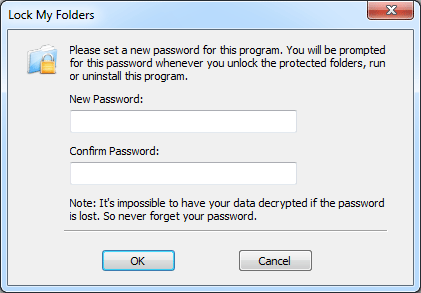
and install the Lock My Folders program on your computer. The first time you launch the program, it will prompt you to set a master password that will be used to encrypt your files later on. Enter a password that you can remember as you'll need it to open and use the program next time.


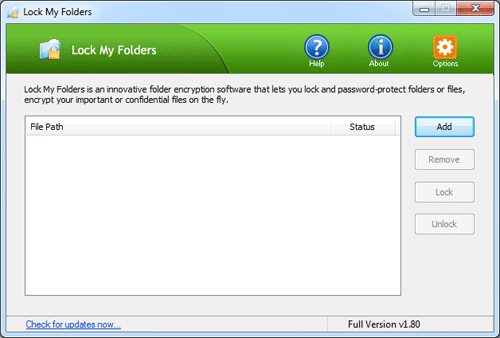
To create an encrypted folder, click on Add button from within the Lock My Folders program.


In the popup window, type your desired folder name and specify the location where you would like your new secure folder to be created. The location can be a folder on your local hard drive or an external USB drive.


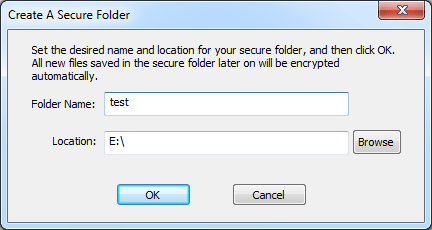
As soon as you clicking OK, your secure folder will be created immediately. This will encrypt every file in this folder and its subfolders. New files created or copied here will also get encrypted.

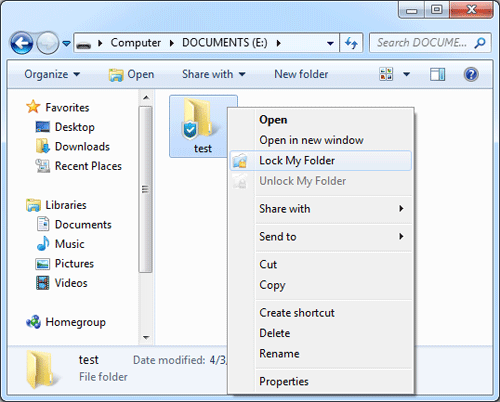
After you finish working with the secure folder. Just right-click on the secure folder and select Lock My Folder. When it's locked, anyone else who uses your computer are unable to view these files. If you shut down or restart your computer, all your secure folders will also be locked automatically for security reason.


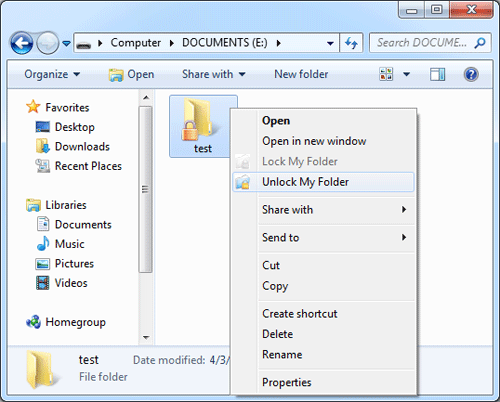
If you need to read or modify your private files, you need to unlock the secure folder firstly. Right-click on the secure folder and select Unlock My Folder.


The program will ask you to enter your password. Upon successfully verifying the password, you can then open and access the secure folder again. It's that simple!
 

Tuesday, January 20, 2015

Reset Lost Windows Password with UBCD4Win Live CD

In this tutorial we'll show you how to reset lost Windows password with the freeware UBCD4Win - Ultimate Boot CD for Windows.

Note: UBCD4Win is a freeware so don't expect it to work with domain controllers. If you want to find a more powerful yet easy-to-use password recovery software, try the PCUnlocker Live CD.

Part 1: Create A UBCD4Win Live CD
  1. Download the freeware UBCD4Win from its official website. The download is pretty big (about 269Mb), so expect to wait a while if your network connection is slow.
  2. After installing, start the UBCD4Win (UBCD4WinBuilder.exe) program. Point the "Source" path to your Windows XP setup CD or Windows 2003 installation CD. However, Vista is not yet supported as a source. UBCD4Win-PE-Builder
  3. Insert a blank CD, select "Burn to CD/DVD" and click Build. The whole process will take a little while.
Part 2: Reset Lost Windows Admin Password
  1. Once the CD has been created, go to the BIOS and make sure your CD-ROM is set as the first boot device. Start up the computer with UBCD4Win in the CD-ROM and you will have some boot options. Choose the "Launch The Ultimate Boot CD for Windows" option. ubcd4win-boot-menu
  2. It will take a few minutes to load fully, but when it does you should see a Windows XP like interface. Once there, go to Start > Programs > Password Tools > NTPWEdit. ubcd4win
  3. Once the utility is open, you need to click the (Re)open button to open up the SAM file which should show you the list of local system accounts for your Windows installation. Select the Administrator account and click on Change Password. nwpwedit
  4. Type your new password twice, or leave the password fields blank if you want to clear the password. Click OK. change-admin-password
  5. Restart the computer, remove the UBCD4Win Live CD from the drive, and you should be able to log into Windows administrator account with the new password you've set.

Saturday, January 3, 2015

Decrypt Facebook Password Stored in Your Web Browser

Having your Web browser remember your Facebook password can be convenient, but sometimes you may forget the password and want to view cached password in your browser. With Password Recovery Bundle you can decrypt website passwords stored in most common web browsers, including Google Chrome, Firefox, Internet Explorer, Apple Safari, Opera, Flock, SeaMonkey and Avant Browser. Here is how to use the program to reveal Facebook passwords stored in your web browser.

How to Decrypt Facebook Passwords Stored in Your Web Browser?

Download and install Password Recovery Bundle on your computer. After installing, start the program and then click on Start Recovery.


As soon as you click on the Start Recovery button, you'll see a drop-down list that displays all supported passwords. From there you need to choose the corresponding option for your Web browser. For example, you have to choose Chrome Password option if your Facebook password is remembered by Google Chrome.


The program will quickly decrypt and reveal all your website passwords along with Facebook login cached in your selected Web browser.