Forgot Windows administrator password and locked out of your PC? Most of Windows password recovery tools require you to create a bootable disc for cracking a password, but what do you do if you don't have a blank CD or USB stick in hand? This tutorial will show you how to boot your locked PC directly over Network Interface Card (NIC), so you can then reset forgotten Windows password without using a CD or USB drive.
PXE works with Network Interface Card (NIC) of the system by making it function like a boot device. Nearly every modern Windows PC has a BIOS which supports PXE booting. Just put the PCUnlocker Live image on a PXE server, you can then boot any other PC/netbook on the same LAN network to use PCUnlocker for resetting a lost Windows password!
Check out this article for detailed instructions:
Windows Password Recovery Using PXE Network Boot
Sunday, December 21, 2014
Monday, December 8, 2014
Create A Bootable External Hard Drive to Install Windows 8
Is it possible to install Windows 8 from an external hard drive? With the freeeare ISO2Disc you can make a
installation CD/USB from Windows 8 ISO image. However, what to do if you
don't have a CD or USB drive in hand? This tutorial will explain how to
create a bootable external hard drive from Windows 8 ISO image, and then install Windows 8 directly from external hard drive.
Part 1: Copy Windows 8 Installation Files to Hard Drive
Part 2: Make External Hard Drive Bootable
Part 3: Install Windows 8
Place the hard drive back into the target machine. Make sure that the BIOS is configured to boot from the hard drive. If you did everything correctly, you should see the blue Windows logo and setup will load. Install Windows 8 as usual (but don’t format your hard drive this time otherwise it will erase the Windows 8 setup files too).
Part 1: Copy Windows 8 Installation Files to Hard Drive
- First connect your hard drive to another working computer as a slave/second drive.
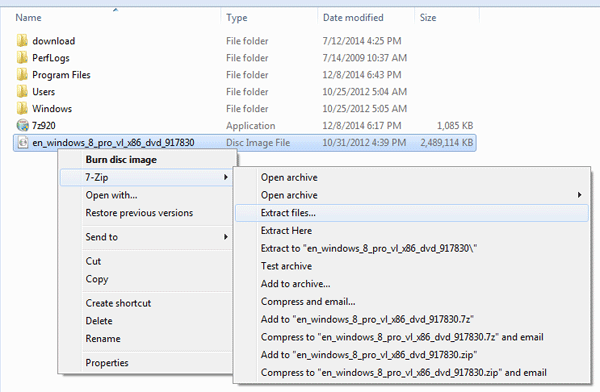
- You need to copy the setup files from Windows 8 ISO to your hard drive. This can be done using the freeware 7-Zip. After installing 7-Zip locally, right-click on your Windows 8 ISO image and select 7-Zip -> Extract files.
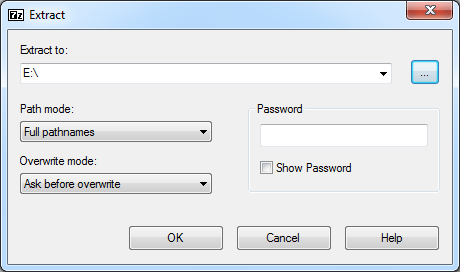
- Next you need to specify where the destination should be. Click … button to select the root path of the attached hard drive. Click OK.
- Now the extracting progress window will display.
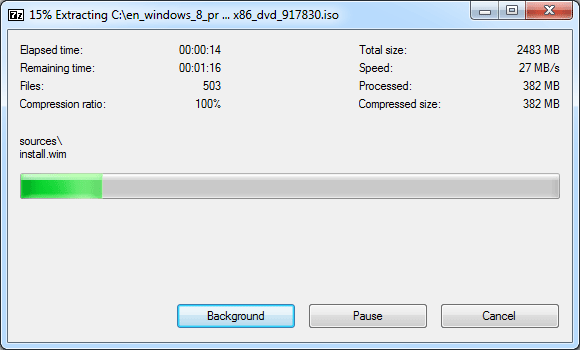
When this is done, the extraction dialog will automatically close. Now you've successfully copied all contents of Windows 8 ISO to your hard drive.
Part 2: Make External Hard Drive Bootable
- Open the Command Prompt with admin privileges. In Windows 7, go to Start > All Programs > Accessories. Right-click on Command Prompt and select Run as administrator.
- In the Command Prompt, type in the following commands, and press Enter key after typing each command.
Diskpart

List Disk

Select Disk 1

List Partition

Select Partition 1

Active

Exit
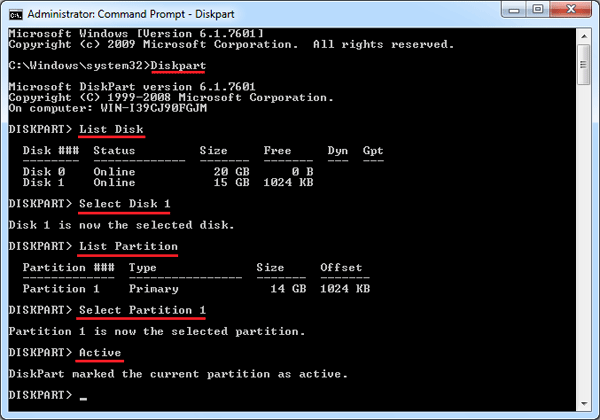
The commands above will set the first partition of your attached hard drive as active. - Next type this command to mark your hard drive as bootable:
e:\boot\bootsect.exe /nt60 e:
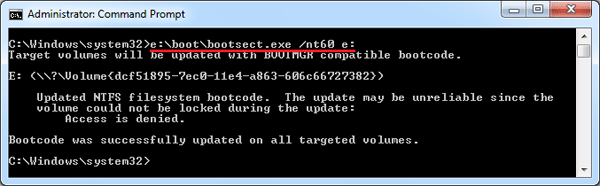
Assuming that e: is the drive letter of attached hard drive, where the Windows 8 installation files are copied to. - At this moment your external hard drive is bootable and you can then use it to install Windows 8. Close the Command Prompt and shutdown the computer.
Part 3: Install Windows 8
Place the hard drive back into the target machine. Make sure that the BIOS is configured to boot from the hard drive. If you did everything correctly, you should see the blue Windows logo and setup will load. Install Windows 8 as usual (but don’t format your hard drive this time otherwise it will erase the Windows 8 setup files too).
Monday, November 17, 2014
Windows 8 Password Recovery on ASUS Laptop
How to reset or bypass Windows 8 password on ASUS laptop that comes with UEFI? There are many bootable Live CDs out there (including Linux distro
or BartPE) that could be used to reset Windows login credentials on
traditional BIOS-based system. But if you try to boot UEFI-based
computer from such a disc, you may get an incompatibility error saying "Reboot and Select proper Boot device or Insert Boot Media in selected Boot device and press a key".
If you couldn't find a UEFI compatible bootdisk, try the most powerful Windows password removal utility - PCUnlocker, a bootdisk based on Windows 8 PE which can boot in UEFI mode from either a USB flash drive or a CD. Here's our guide on how to reset Windows 8 password on ASUS laptop.
Part 1: Create A PCUnlocker Live CD/USB Drive
- Before resetting ASUS laptop password, you need to use another computer to make a PCUnlocker boot media. After you've downloaded the full version of PCUnlocker Enterprise (trial version), unzip it and you'll get a disc image file called pcunlocker.iso.
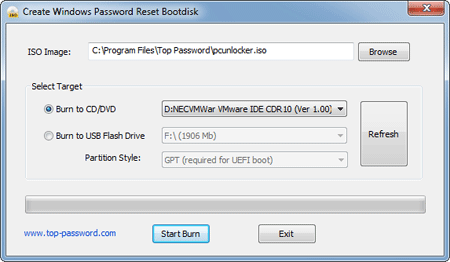
- Next download and install the freeware ISO2Disc. Run the ISO2Disc program, click on Browse button to select the PCUnlocker ISO image.

- To make a PCUnlocker Live CD, simply select Burn to CD/DVD and click on Start Burn. However, if you don't have a blank CD at hand, you can make a UEFI bootable USB drive: Choose your USB drive and select GPT partition style, and then click on Start Burn.
- Plug the USB drive into a USB port of your locked ASUS Windows 8 laptop, or put the CD in the optical drive if you've created a Live CD.
- Turn on the computer and immediately press the F2, or Delete
key repeatedly until the UEFI (BIOS) Setup screen appears. Since boot
is extremely fast, I always need a few attempts to get inside.
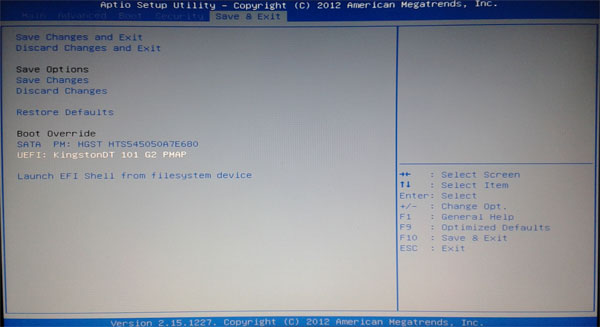
- In BIOS, go to the Save & Exit tab. Select your CD or USB drive under Boot Override and press Enter. The computer will automatically boot from your specified boot media.
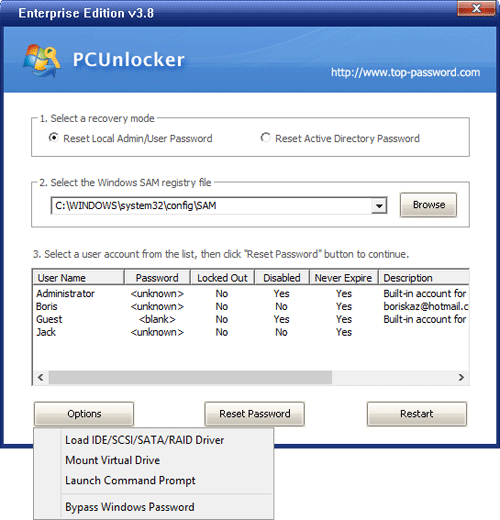
- After one or two minutes, you'll see the PCUnlocker program
that lists all of your existing Windows accounts. If you've set up a
Microsoft account as your laptop's login, you can see the associated
email address in the Description column.

- Choose a local account and then click Reset Password button, it will reset your forgotten local account password immediately. To unlock a Microsoft account, choose the associated local account and proceed. The program will assign a new password: Password123 to your MS account for logging on locally.
Monday, November 10, 2014
How to Back Up the Registry in Windows 8/7/Vista
Windows Registry is a critical database that stores settings for everything on a Windows PC — from application settings, user passwords, device driver info, Windows settings, and pretty much everything else. A corrupt or damaged registry can cause your system crashes, freezes or unbootable. That is why we need to back up the registry regularly. In this article we'll show you how to back up the registry in Windows 8/7/Vista, using the bootable disc - PCUnlocker.
How to Back Up the Registry in Windows 8/7/Vista?
PCUnlocker comes as a self-extracting zip file which contains a bootable CD image. Download the program and unzip it locally. Burn the CD image to your CD with your favorite burning program or ISO2Disc.
Boot your computer from the newly burned CD. After booting from the CD, you'll get to the PCUnlocker program. Despite this program is mainly designed for resetting lost Windows password, it can also be used to back up any files on your computer, including the registry.
Click on the "Option" button and select "Launch Command Prompt".
When the Command Prompt starts, run the following commands one by one:
In the event of registry corruption that prevents your computer from running, just boot to the PCUnlocker program and then restore your registry files by running this command:
How to Back Up the Registry in Windows 8/7/Vista?
PCUnlocker comes as a self-extracting zip file which contains a bootable CD image. Download the program and unzip it locally. Burn the CD image to your CD with your favorite burning program or ISO2Disc.
Boot your computer from the newly burned CD. After booting from the CD, you'll get to the PCUnlocker program. Despite this program is mainly designed for resetting lost Windows password, it can also be used to back up any files on your computer, including the registry.
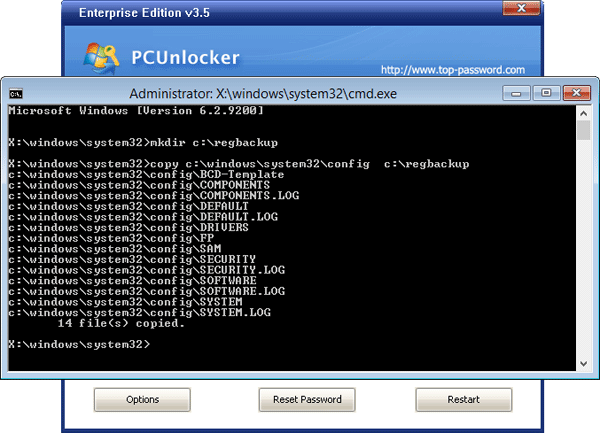
Click on the "Option" button and select "Launch Command Prompt".
When the Command Prompt starts, run the following commands one by one:
mkdir c:\regbackupThis will create a backup folder and copy all your registry files to that folder.
copy c:\windows\system32\config c:\regbackup
In the event of registry corruption that prevents your computer from running, just boot to the PCUnlocker program and then restore your registry files by running this command:
copy c:\regbackup c:\windows\system32\configDone! Now you know how to backup and restore Windows registry. This trick will come in handy before you make any major registry changes or install a software that might corrupt your system.
Tuesday, October 21, 2014
Reset Forgotten Windows 8.1 Password on ThinkPad 10 Tablet
How to unlock ThinkPad 10 tablet if you've forgotten your Windows 8.1 password? It's clearly an issue all of us have experienced at some point in
time with varying degrees of importance and frustration. In this article
we'll provide an easy way to reset forgotten Windows 8.1 password on ThinkPad 10 tablet.
First of all, you need to create a bootable PCUnlocker USB drive on another PC you have access to. Boot your ThinkPad 10 tablet from the USB drive and it enables you to reset forgotten Windows 8.1 admin/user password easily. Here are step-by-step instructions.
Note: PCUnlocker Enterprise supports both 32-bit UEFI and 64-bit UEFI. If your tablet comes with Windows 8/8.1 32-bit preinstalled, make sure you use the 32-bit distribution of PCUnlocker Enterprise. Otherwise you need to use 64-bit distribution instead.
How to Reset Forgotten Windows 8.1 Password on ThinkPad 10 Tablet?
- Download the zipped ISO image of PCUnlocker Enterprise program. After you've downloaded it, double-click the download file and your system will display all files inside the zip archive. Drag the pcunlocker.iso from there and save it on your desktop.
- Install ISO2Disc program and launch it. Click on Browse button to locate the ISO image you've downloaded, then choose the USB flash drive you've plugged in, select the GPT (required for UEFI boot) partition style. Click on Start Burn to create a bootable PCUnlocker USB drive.
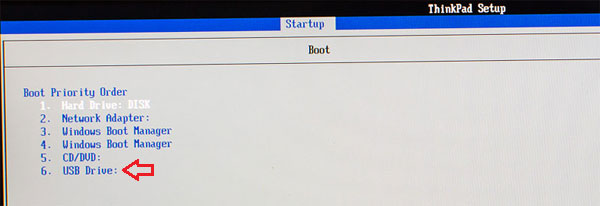
- Plug the USB drive to your ThinkPad 10 tablet PC. When you turn on the tablet, press the power button together with the volume up button at the same time to enter the ThinkPad Setup program.
- Once into the BIOS screen, select Startup then Boot. Move your attached USB drive to the top of the bootable device list.
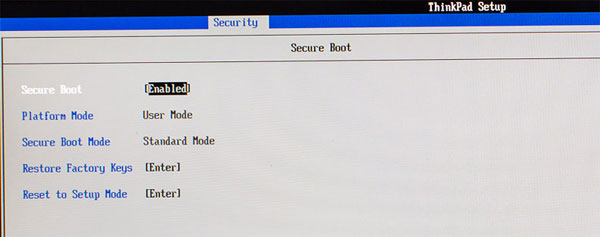
- Switch to the Security tab, disable the Secure Boot option. Press F10 to save your changes and then reboot.
- After booting from USB drive, it will start the WinPE operating
system inside the USB drive and eventually open up the PCUnlocker
program. PCUnlocker automatically searches your Windows 8.1 installation
and displays a list of Windows 8.1 user accounts on your ThinkPad 10 tablet.
- Choose a user account and click on Reset Password button. The program will reset your forgotten Windows 8.1 password immediately. Restart the tablet and remove the USB drive. You can then log into your ThinkPad 10 tablet without a password!
Wednesday, September 24, 2014
ASUS Zenbook Windows 8 Password Recovery Tutorial
Lost Windows 8 password and can't log on to your ASUS Zenbook? A
forgotten password is no need for panic. As long as you have a password
removal utility, you can get back into Windows 8 Ultrabook in minutes. PCUnlocker
is one of the best recovery tools that can help you get rid of
forgotten Windows 8 password with ease. The following is a walkthrough
of using a CD to reset Windows 8 admin password on ASUS Zenbook
Ultrabook.
First of all, you need to make a PCUnlocker Live CD using a secondary computer, not your locked PC. Download the ISO image of PCUnlocker and burn it onto a blank CD with your CD burning program. If you don't have one, try the freeware ISO2Disc or ImgBurn.

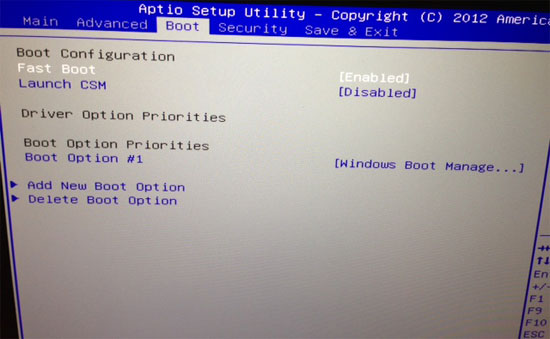
Once you've created a PCUnlocker Live CD, put it in the CD drive of your locked ASUS Zenbook laptop. Power on the machine and repeatedly press F2 key to enter the BIOS Setup. Go to the Security tab and disable the Secure Boot Control option. Navigate to the Boot tab, disable Fast Boot and enable Launch CSM. Press F10 to save and exit.
Press and hold ESC key to launch Boot Menu when the computer restarts. Select the CD drive from the list and press Enter to boot from it. After a while, the PCUnlocker program will launch and it shows you a list of local accounts for your Windows 7 installation.
Select the administrator account and click on Reset Password button. This will reset your ASUS Zenbook login password immediately. Take out the CD and reboot, you can then get back into your Windows 7 system without entering a password!
First of all, you need to make a PCUnlocker Live CD using a secondary computer, not your locked PC. Download the ISO image of PCUnlocker and burn it onto a blank CD with your CD burning program. If you don't have one, try the freeware ISO2Disc or ImgBurn.
Once you've created a PCUnlocker Live CD, put it in the CD drive of your locked ASUS Zenbook laptop. Power on the machine and repeatedly press F2 key to enter the BIOS Setup. Go to the Security tab and disable the Secure Boot Control option. Navigate to the Boot tab, disable Fast Boot and enable Launch CSM. Press F10 to save and exit.
Press and hold ESC key to launch Boot Menu when the computer restarts. Select the CD drive from the list and press Enter to boot from it. After a while, the PCUnlocker program will launch and it shows you a list of local accounts for your Windows 7 installation.
Select the administrator account and click on Reset Password button. This will reset your ASUS Zenbook login password immediately. Take out the CD and reboot, you can then get back into your Windows 7 system without entering a password!
Monday, September 1, 2014
Forgot Windows 8.1 Pro Password on Microsoft Surface Pro 3
Couldn't login to your Microsoft Surface Pro 3 after forgotten Windows 8.1 Pro password? Is there a way to crack or reset Surface Pro password without data loss? As Surface Pro 3 uses the latest UEFI firmware, in this tutorial we'll explain how to bypass Surface Pro 3 password with PCUnlocker, which supports both UEFI booting and password resetting for local/Microsoft account.
How to Reset Windows 8.1 Pro Password on Microsoft Surface Pro 3?
To get PCUnlocker to work, you need to use a spare PC to download the Enterprise edition of PCUnlocker which comes as a self-extracting ZIP file. Unzip the downloaded file and you'll get a CD image called pcunlocker.iso.
Burn the ISO image to your USB flash drive using the freeware ISO2Disc. Remember to choose the GPT partition style, because MBR-based bootdisk is unable to boot with UEFI mode.
Once you've create a PCUnlocker Live USB drive, insert it into the USB port of your Surface Pro 3 tablet. Make sure your tablet is powered off at this point. Press and hold the volume-down button (on the left side of your tablet), then press and release the Power button (on the top). When the Surface logo appears, release the volume-down button. Surface will boot from your USB drive.
After loading the Windows 8 PE from the USB drive, you'll be taken to the PCUnlocker program. It shows you a list of local accounts that is extracted from your Windows 8.1 SAM registry hive. If you use an email account for signing into your tablet, you can see your email address in the "Description" column of the associated local account.
Select a local account and click on Reset Password button. It will bypass / reset your forgotten login password in no time. If you've chosen the local account associated with your email address, the program will assign a new password for your Microsoft account login (Note: this new password can be used to log on your tablet locally).
Now you've successfully bypassed Surface Pro 3 password. Restart the computer and disconnect the USB drive, you can then log on your Surface without a password!
Tuesday, August 26, 2014
How to Reset Forgotten Windows 8.1 Password on Dell XPS Ultrabook
Forgot Windows 8.1 password on your Dell XPS ultrabook? Is there a
way to reset or bypass Dell XPS login password? There are a number of other ways to get around Windows 8.1 password, but the easiest way is resetting the lost password with PCUnlocker,
a bootable utility that can bypass any local / Microsoft account
password in Windows 8.1, including locked or disabled accounts. In this
tutorial I'll show you how to reset forgotten Windows 8.1 password on Dell XPS ultrabook.
Part 1: Create A PCUnlocker Live CD/USB Drive
Part 1: Create A PCUnlocker Live CD/USB Drive
- Before resetting Dell XPS password, you need to use another computer to make a PCUnlocker Live CD/USB drive. Simply download the trial version of PCUnlocker Enterprise, unzip the downloaded file and you'll get an ISO image file called pcunlocker.iso.
- Next download and install the freeware ISO2Disc. Run the ISO2Disc program, click on Browse button to select the PCUnlocker ISO image, then choose your CD recorder or USB flash drive.

- Click on Start Burn. A bootable PCUnlocker CD or USB drive will be created in minutes.
- Insert the burned CD or USB drive into your Dell XPS 12/13/15 ultrabook.
- Turn on (or restart) your computer. When the DELL logo is displayed, watch for the F2 prompt to appear and then press F2 immediately to access the UEFI Setup.
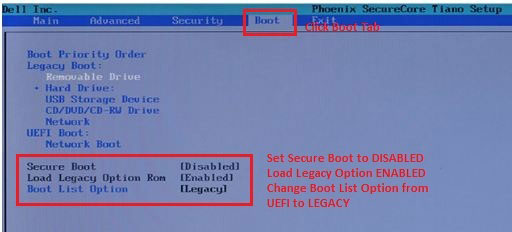
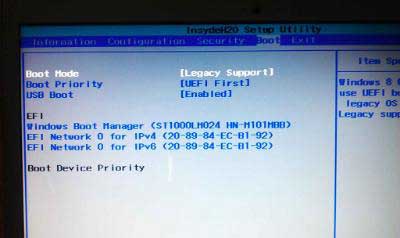
- Navigate to the Boot tab by using the arrow keys of the keyboard. Disable Secure Boot and enable Load Legacy Option Rom. Change Boot List Option from UEFI to Legacy.
- Save your changes and exit BIOS. The computer will restart automatically. When you see the DELL logo again, repeatedly press F12 until the Boot Options menu appears.
- On the Boot Options menu choose the device you want to boot from. For example, if you are booting to PCUnlocker Live CD, highlight CD/DVD/CD-RW Drive and press Enter.
- After a while, you'll see the PCUnlocker program and it
shows you a list of local accounts existing on your Dell XPS ultrabook.
- Choose a local account and then click Reset Password button, it will reset your forgotten password immediately. If you use a Microsoft Account as your PC's login, choose the local account associated with your Windows Live ID and then reset its password.
Saturday, August 16, 2014
Reset Forgotten Windows 8 Password on HP Desktop PC
Forgot administrator password for your Windows 8 HP computer? There may be
occasions when for whatever reason you can't get into your HP computer
because you've lost the Windows 8 password, maybe you just change the
login password but can't remember the new password. Don't fear though,
there is a simple way to remove HP Windows 8 login password.
In this tutorial I will explain how to reset lost password on a brand new HP desktop running Window 8 using a bootdisk - PCUnlocker Live CD/USB drive.
Part 1: Create A PCUnlocker Live CD/USB Drive
In this tutorial I will explain how to reset lost password on a brand new HP desktop running Window 8 using a bootdisk - PCUnlocker Live CD/USB drive.
Part 1: Create A PCUnlocker Live CD/USB Drive
- Before removing lost HP password, you need to make a PCUnlocker boot media from an alternate PC. Simply download the trial version of PCUnlocker, unzip the downloaded file and you'll get a bootable CD image file named pcunlocker.iso.
- Next download and install the freeware ISO2Disc. Run the ISO2Disc program, click on Browse button to select the PCUnlocker ISO image.
- To make a PCUnlocker Live CD, simply select Burn to CD/DVD and click on Start Burn. If you don't have a blank CD at hand, you can choose to make a bootable USB flash drive.
- Plug the USB drive into a USB port of your HP desktop PC requiring a password removal, or put the CD in the optical drive if you've created a Live CD.
- Turn on the computer and immediately press the F10 key repeatedly, about once every second, until the BIOS Setup Utility opens.
- Navigate to the Security menu and choose Secure Boot Configuration.
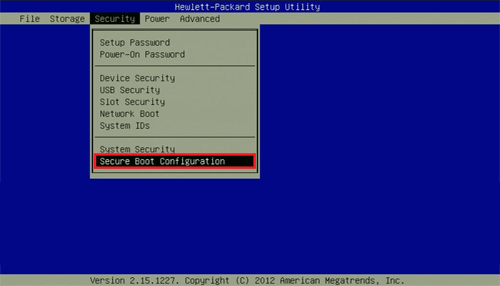
- When the Secure Boot Configuration warning displays, press F10 to continue.
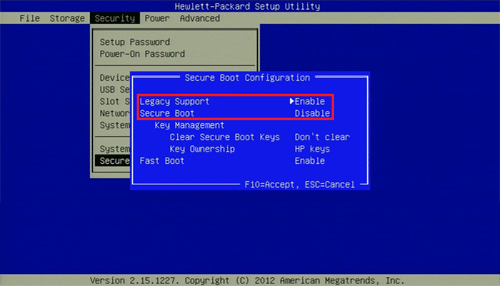
- At the Secure Boot Configuration page, enable Legacy Support and disable Secure Boot. Press F10 to save your changes.
- The computer will then reboot. Quickly press ESC key to enter the Startup Menu.
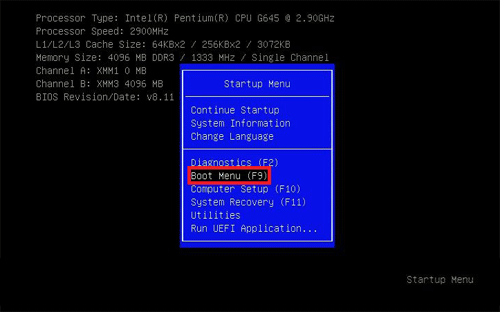
- Press F9 to access the Boot Menu. At the Boot Menu screen specify your boot device (CD or USB).
- Once booted into PCUnlocker Live CD/USB drive, you'll see a
list of local accounts that are stored in your Windows 8 SAM registry
hive.
- Choose an account and then click Reset Password, it will reset your Windows 8 login password instantly. If you've chosen the local account associated with your Windows Live account, it will also reset your Microsoft account password locally.
Wednesday, August 6, 2014
Log on Automatically to Windows 8 Microsoft Account without Password
For security purpose, we usually set a long and strong password
for a Microsoft account, which is fine when I'm logging in to Microsoft
website because my password manager software helps - but that's no good
for logging into Windows 8. If you don't want to type in your password
every time Windows starts up, you can setup Windows 8 so that it will
bypass the login screen and log on to your Windows 8 Microsoft account
automatically.
Tips: If you've forgotten your Microsoft account password and unable to reset the password online, you can bypass Windows 8 Microsoft account password with PCUnlocker, so you can still log back into your system and regain access to all your files.
How to Log on to Windows 8 Microsoft Account without Password?
- Press the Windows + R keyboard combination to bring up a Run box, when it appears type
netplwizand hit Enter.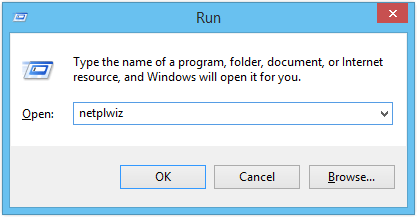
- This will open the User Accounts dialog box, which will display a list of all the users on your computer, including both local accounts and Microsoft accounts.
- Next click on the username in the bottom window, which should be
your email address if you are using the Microsoft account to log into
your Windows 8 PC. Uncheck the Users must enter a username and password to use this computer checkbox.
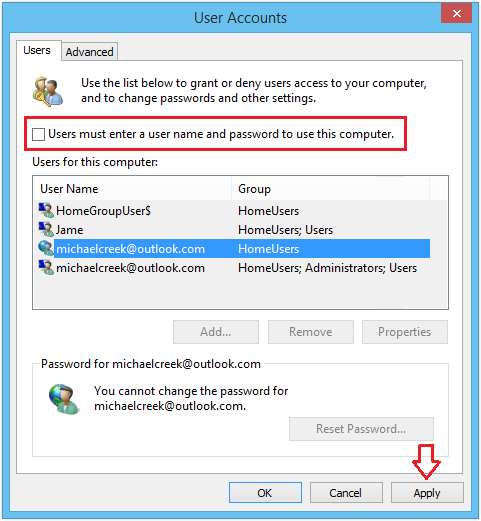
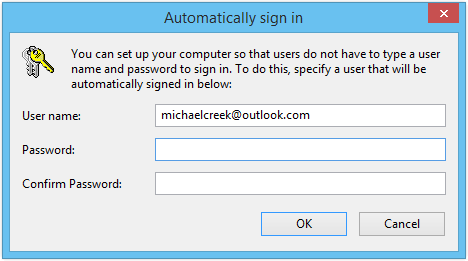
- Click Apply and you'll get a pop up dialog that
asks you to enter your login credentials. Just type in your Microsoft
account password twice and click OK.
- Now go ahead and restart your computer and Windows 8 should automatically boot up to the Start Screen, without prompting you to enter a Microsoft account password.
Friday, July 25, 2014
How to Unlock Acer Aspire Laptop After Forgot Windows 8 Password
Locked out of your Acer Aspire laptop because you've forgotten Windows 8 login password? PCUnlocker
is an amazing bootdisk that can reset Windows 8 Microsoft / local
account password offline. Here's a detailed walkthrough on how to reset
lost Windows 8 password on Acer Aspire laptop, which will guide you
directly through all the steps involved.
Part 1: Create A PCUnlocker Boot Disk
Part 1: Create A PCUnlocker Boot Disk
- Before resetting Acer laptop password, you need to use another computer to make a PCUnlocker boot disk. Simply download the trial version of PCUnlocker Enterprise, unzip the downloaded file and you'll get an ISO image file called pcunlocker.iso.
- Next download and install the freeware ISO2Disc. Run the ISO2Disc program, click on Browse button to select the PCUnlocker ISO image.
- Select your target media (CD or USB drive) and Click on Start Burn to make a PCUnlocker bootdisk.
- Once you've completed the above step, put in the CD into the optical drive or plug in the USB drive into the Acer Aspire laptop you want to reset the password for.
- Power on your Acer Aspire laptop. As soon as the Acer logo screen appears, immediately press the F2 key, or the DEL key if you have a desktop, to enter the BIOS.
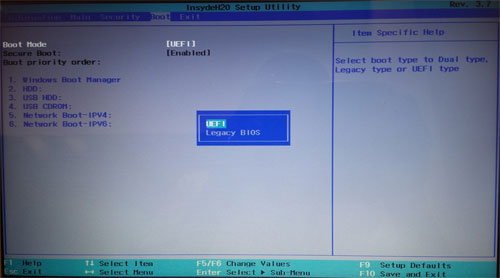
- Once you're in the BIOS Setup, go to the Boot menu. Disable the Secure Boot option and change Boot Mode from UEFI to Legacy BIOS. Move the CD-ROM or USB HDD to the top of the boot priority order list.
- Press F10 to save your changes and exit the BIOS.
- The computer will then restart from PCUnlocker boot disk.
After a while, you'll see the PCUnlocker program and it shows you a list
of local accounts existing on your Acer Aspire laptop.
- Choose a local account and then click Reset Password button, it will reset your forgotten password immediately. If you use a Microsoft account as your laptop's login, you can see your Windows Live ID in the Description column. Choose that associated local account to proceed, this program will assign a new password to your Microsoft account which can later be used to login to Windows 8 locally.
Thursday, July 3, 2014
Lenovo Yoga Windows 8.1 Laptop Password Reset
Forgot Windows 8.1 password to your Lenovo Yoga laptop? Ever wondered
how to recover or reset a forgotten Windows password? PCUnlocker
is a reliable, self-booting recovery CD that can reset the password of
Windows 8, 7, Vista and XP. Just boot up your Lenovo Yoga laptop with
PCUnlocker Live CD and you can bypass Windows 8.1 password easily!
Note: This method works on all Lenovo Yoga series laptops that come with Windows 8.1 pre-installed, including Yoga 2 Haswell, Yoga 2 Bay Trail, Yoga 2 Pro.
How to Reset Forgotten Windows 8.1 Password on Lenovo Yoga Laptop?
Before getting started, you need to make a PCUnlocker Live CD on an alternate computer. Download the zipped ISO image of PCUnlocker and extract it. Next burn the resulting pcunlocker.iso file to a blank CD (or USB stick) using the ISO2Disc program.
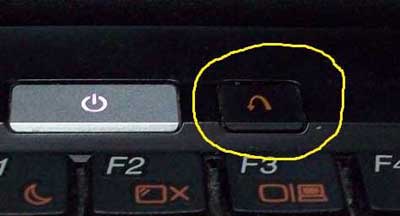
Put the CD in the CD drive of your Lenovo Yoga laptop. To get the laptop to boot from CD, we need to go into the BIOS and switch the Boot Mode from Unified Extensible Firmware Interface (UEFI) to Compatibility Support Mode (CSM). When the computer is off, press the Novo button and then select BIOS Setup.
In the BIOS Setup Utility, go to Security tab, and disable the Secure Boot option. Next, on the Boot tab, change the Boot Mode from UEFI to Legacy Support. Save the changes and exit BIOS. Shut down the laptop and then press the Novo button again and then choose Boot Menu. Choose to boot from PCUnlocker Live CD.
The laptop will load the WinPE OS from CD and open up the PCUnlocker utility. At this point the program can directly access the Security Accounts Manager (SAM) database and extract all your Windows user accounts.
Select your user account and click on "Reset Password" button. The program will reset your forgotten password by modifying the stored password hashes in the SAM registry file. Restart the computer and take out the CD. You can then log back into your Lenovo Yoga Windows 8.1 laptop with a blank password!
Conclusion
The advantage of this method is that it is very quick if you already have the PCUnlocker Live CD in your tool box. Thus it is useful for admins who have to perform this procedure often.
Note: This method works on all Lenovo Yoga series laptops that come with Windows 8.1 pre-installed, including Yoga 2 Haswell, Yoga 2 Bay Trail, Yoga 2 Pro.
How to Reset Forgotten Windows 8.1 Password on Lenovo Yoga Laptop?
Before getting started, you need to make a PCUnlocker Live CD on an alternate computer. Download the zipped ISO image of PCUnlocker and extract it. Next burn the resulting pcunlocker.iso file to a blank CD (or USB stick) using the ISO2Disc program.
Put the CD in the CD drive of your Lenovo Yoga laptop. To get the laptop to boot from CD, we need to go into the BIOS and switch the Boot Mode from Unified Extensible Firmware Interface (UEFI) to Compatibility Support Mode (CSM). When the computer is off, press the Novo button and then select BIOS Setup.
In the BIOS Setup Utility, go to Security tab, and disable the Secure Boot option. Next, on the Boot tab, change the Boot Mode from UEFI to Legacy Support. Save the changes and exit BIOS. Shut down the laptop and then press the Novo button again and then choose Boot Menu. Choose to boot from PCUnlocker Live CD.
The laptop will load the WinPE OS from CD and open up the PCUnlocker utility. At this point the program can directly access the Security Accounts Manager (SAM) database and extract all your Windows user accounts.
Select your user account and click on "Reset Password" button. The program will reset your forgotten password by modifying the stored password hashes in the SAM registry file. Restart the computer and take out the CD. You can then log back into your Lenovo Yoga Windows 8.1 laptop with a blank password!
Conclusion
The advantage of this method is that it is very quick if you already have the PCUnlocker Live CD in your tool box. Thus it is useful for admins who have to perform this procedure often.
Monday, June 2, 2014
Dell Latitude 10 Windows 8 Tablet Password Reset
Forgot Windows 8 password to your Dell Latitude 10 tablet? Is there a way to delete/reset or change password? With PCUnlocker you can reset Windows 8 login password by booting off a USB drive. In this tutorial I'll walk you through the steps of resetting lost Windows 8 password on Dell Latitude 10 tablet.
Step 1: Create a UEFI Bootable USB Drive
Dell Latitude 10 table comes with 32-bit UEFI firmware, which requires you to make a USB drive with GPT and FAT32 from a 32-bit OS. To get started, download the 32-bit UEFI version of PCUnlocker from this link. The downloaded file is a self-extracting .zip file which contains a WinPE ISO image. Extract the ISO image and burn it to your USB drive using the ISO2Disc program. Remember to choose the GPT partition style which is required for UEFI booting.
Step 2: Boot Dell Latitude 10 Tablet from USB
Insert the USB drive into your Dell Latitude 10 tablet. After you press the power button, all you need to do is press the volume up button and hold it until the boot select menu appears. Choose the USB drive from the menu and press Enter.
Step 3: Reset Windows 8 Tablet Password
After booting into the USB drive, you'll see the PCUnlocker program in minutes. The program displays a list of Windows 8 local accounts existing in your Dell Latitude 10 tablet. Choose a user account and click on "Reset Password" button, the program will unlock and reset your forgotten Windows 8 password quickly.
Disconnect the USB drive and restart your tablet. You can then log back into Windows 8 user account without a password! Enjoy it!
Thursday, May 22, 2014
Remove Forgotten Windows 8 Password on Lenovo IdeaPad with UEFI BIOS
Forgot Windows 8 admin password for your Lenovo IdeaPad laptop? It turns out that removing lost Windows account password is
frighteningly easy, as long as you have physical access to the machine. In this tutorial I'll walk
you through the steps to remove Windows 8 password on Lenovo IdeaPad
with UEFI BIOS.
How to Remove Windows 8 Password on Lenovo IdeaPad with UEFI BIOS?
How to Remove Windows 8 Password on Lenovo IdeaPad with UEFI BIOS?
- First of all, use another computer to download the PCUnlocker program, which comes as a self-extracting .zip file. After the file has downloaded, extract the pcunlocker.iso file from it. Burn the ISO image to a blank CD using your preferred CD burning program such as ISO2Disc.
- Put your newly created CD in the CD drive of your Lenovo IdeaPad laptop. When the laptop is powered off, press the Novo button. This will start up the laptop and provide you with the Novo button menu.
-
Choose BIOS Setup from the Novo button menu, and press Enter.

- In the BIOS Setup, select the Security tab and change Secure Boot value to Disabled.

- Next, on the Boot tab, change the Boot Mode from UEFI to Legacy Support.
- You can now save and exit the BIOS, but the laptop will go straight to booting again, so you'll need to shutdown or power it off in order to use the Novo button again. This time choose Boot Menu from the Novo button menu, and then select to boot from the CD drive.
- After booting the laptop from the CD, it loads the Windows PE
operating system and finally opens up the PCUnlocker program. The
program automatically detects the operating system installed on your
hard drive, and then displays a list of Windows 8 local user accounts.
- Choose one of your administrator accounts and click on Reset Password button. The program will unlock your selected account and remove the password immediately. Eject the CD and restart your computer. Enter into BIOS Setup and change the BIOS Mode back to UEFI.
- Now you've successfully removed Windows 8 Password on Lenovo IdeaPad with UEFI BIOS, and you can log back into Windows 8 without a password! Enjoy it!
Wednesday, April 16, 2014
Unlock Windows 8 ASUS Laptop If Forgot the Admin Password?
Forgot the admin password on your Windows 8 Asus laptop and don't have a
reset disk? If you've lost your Windows 8 password, you won't be able
to log in.
Here's how to unlock Windows 8 Asus laptop password with a CD.
- Download and install Password Recovery Bundle on another computer with Internet access. Launch the program and click the Windows Password button, and you'll get the interface as follow.
- Place a blank CD in the CD-ROM drive of the computer, then click the Refresh button and select the device you just plug in. Click the Start Burn button to begin the burning process. A bootable password reset disk will be ready in a few minutes.
- Now go back to your Asus PC, and insert the Windows password reset disk you just made.
- Turn on the computer. When the Asus splash screen is displayed, a boot menu prompt may be displayed for a few seconds near the bottom of the screen, indicating that a key (F2 or Del, for example) can be pressed to enter into BIOS Setup.
- After entering into BIOS, select CD/DVD as the first boot device. If your computer comes with UEFI BIOS, you also need to Set Windows 8 PC to Boot with Legacy BIOS Mode Instead of UEFI Mode.
- Once booting from the CD, it begins loading the Windows PE OS and you'll reach the main window of PCUnlocker program in minutes.
- Choose the administrator account and click the Reset Password button. This will unlock and reset lost Asus password instantly.
- Click the Restart button to reboot your Asus computer, you'll be able to login to Windows 8 administrator account with a blank password.
Saturday, April 12, 2014
How to Crack Windows 8 Picture Password and Pin Code Instantly
In this tutorial we'll show you how to crack Windows 8 picture password and pin code,
without brute-forcing them. Both Pin code and Picture Password are
authentication methods based on a local user account. During setting up a
Pin code or Picture Password, you'll be prompted to enter the
traditional text-based password. The problem is that Windows 8 will then
store your Pin code / Picture password as well as the original text
password in plain text.

Mimikatz is a free open-source tool to recover this plain-text password, it saves you time and power needed to brute force a 16 character NT/LM password during pen-testing or tech work. Follow this tutorial and you can recover Windows 8 Pin code and Picture Password in no time.
Note: Mimikatz needs admin privileges to work properly. If you couldn't log on to Windows 8 as administrator, you can reset the forgotten local administrator password or Microsoft account password with PCUnlocker Live CD/USB drive.
How to Recover Windows 8 Picture Password and Pin Code?
- Download the Mimikatz tool (mimikatz_trunk.zip) from Benjamin Delpy’s blog. Decompress the zip file and you'll then find that the tool has both 32-bit and 64-bit versions – make sure you pick the correct version.
- Right-click on the Mimikatz.exe file and select Run as administrator from the context menu.
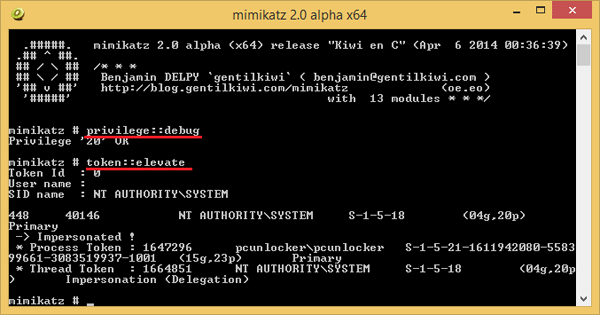
- You'll be provided with an interactive prompt that allows you to
perform a number of different commands. Firstly we'll need to enable
debug mode with the privilege::debug command:
privilege::debug
- Next run the token::elevate command to elevate your privilege to NT Authority\SYSTEM.
token::elevate
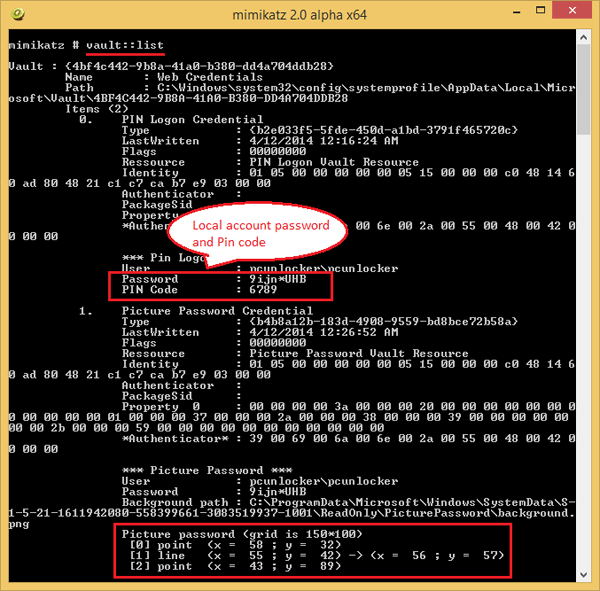
- Execute the following command and it will quickly extract all types
of plain-text passwords from Windows Vault, including Pin code, Picture
Password and traditional text password.
vault::list
Monday, March 31, 2014
Enable A Disabled Local Administrator Account Offline in Windows 8
Did you mistakenly disable the local administrator account whiles
logged in? If you are locked out of your computer, for example you
forgot your password and can't log in using any user account, you need
to enable the administrator account offline. With PCUnlocker Live CD you
can enable a disable local administrator account in Windows 8, 7, Vista
and XP. This tool can also reset Windows administrator password if you have forgotten it.
How to Enable A Disabled Local Administrator Account Offline in Windows 8?
All you need is to make a Live CD using another computer that you have full access to, then boot your locked machine from the CD and it allows you to enable a disabled Windows administrator account easily! Here are step-by-step instructions:
Step 1: Create A PCUnlocker Live CD/USB Drive
- Click here to download and save the PCUnlocker self-extracting Zip file to a folder on your hard drive, then extract the ISO image file: pcunlocker.iso from it.
- Insert a blank CD or USB flash drive into your computer. Download and install the freeware ISO2Disc.
- Start the ISO2Disc program. Click the Browse button to locate your ISO image file, then click the Start Burn button to make a PCUnlocker Live CD or USB drive.
Step 2: Boot Your Locked PC from CD/USB Drive
- Connect the burned CD or USB drive to your locked computer. When it is powered on, check the boot-screen for setup key (i.e. DELETE key, F8 key, F2 key) to enter BIOS Setup Utility.
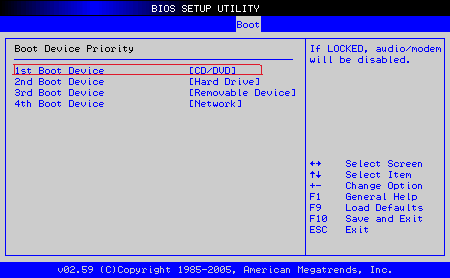
- Use the arrow keys to select the BOOT tab, then change the Boot Device Priority:
Set 1st Boot Device to CDROM if you just created a bootable CD or DVD,
or set 1st Boot Device to Removable Device if a bootable USB flash drive
was created.
- Press F10 to save your changes. Now your computer will restart and then boot from PCUnlocker Live CD/USB drive. If you still can’t get your computer to boot from the CD/USB drive, please refer to this boot up troubleshooting guide.
Step 3: Enable A Disabled Local Administrator Account
- After the computer boots up from the CD or USB drive, it will start
the PCUnlocker program which displays a list of local accounts that are
stored in Windows SAM registry hive. Select the disabled local
administrator account and click on Reset Password button.
- Click Yes to confirm your operation. The program will enable the local administrator account and also remove its password if it is protected with a password.
- Click Restart to reboot the computer and remove the CD or USB drive. You can then log into Windows 8 local administrator account without a password.
How to Remove Password Expiration in Windows 7
You might find it is quite annoying when Windows 7 one day tell you that your password
was about to expire. Here is an easy workaround to remove the password expiration in Windows 7.
- Open the Local Users and Groups administration panel. You can access it by pressing Windows key + R to bring the Run box and entering lusrmgr.msc.
- Double click to select your user.
- Check the box next to "Password never expires".

- Click OK, and your done.

Monday, March 24, 2014
Recover Internet Explorer 11 Saved Password in Windows 8
How to recover your saved website passwords from
Internet Explorer 11? In versions 7, 8 and 9 of Internet Explorer,
passwords are protected using DPAPI and the login URL as entropy before
being saved in the registry. Since Internet Explorer 10, it no longer
stores encrypted passwords in the registry, and they're stored in the
Windows Vault, which is the default storage vault for the credential
manager information.
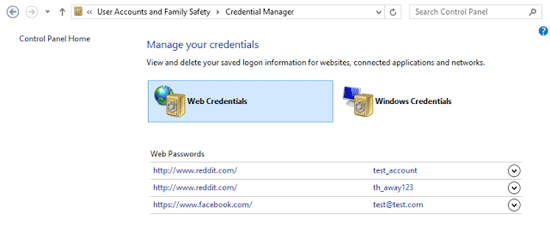
In this article we'll show you how to recover Internet Explorer 11 saved passwords from Windows Vault. With the Internet Explorer Password Recovery program you can retrieve all autocomplete passwords that are stored in the Credential Manager. This can be useful if a user forgot the password before reinstalling Windows.
How to Recover Internet Explorer 11 Saved Passwords?
- Download and install the Internet Explorer Password Recovery program on your computer.
- After you've installed it, start the program.
- Click on the Start Recovery button, and then select the Recover IE Password option from the drop-down menu.

- The program will decrypt your website passwords saved in Windows Vault, and display the login information (including website URL, username and password) immediately.
Subscribe to:
Posts (Atom)