How can I disable the password complexity requirements in Windows Server Core? Because there is no GUI for accessing the Group Policy Editor, you have to do most of the work of configuring a Server Core installation by typing commands in the Command Prompt. In this tutorial we'll show you how to disable password complexity requirements in Windows Server Core.
If your server is a domain controller, follow the steps below and
you can change the default domain password policy. To change the local
password policy on a domain controller, you must boot your server in
Directory Services Restore Mode (DSRM) and then perform the steps below:
- Open an elevated Command Prompt. If you've forgotten the local or domain administrator password and couldn't log on, try the PCUnlocker bootdisk for bypassing the password.
- Type the following command and hit Enter:
secedit.exe /export /cfg C:\secconfig.cfg

This will dump the local policy or domain policy for the system, including account policies, audit policies, and so on.
- Open the C:\secconfig.cfg file with your text editor. For
Windows Server Core, you can type notepad.exe in the Command Prompt.
When Notepad launches, click the File -> Open menu to open C:\secconfig.cfg.
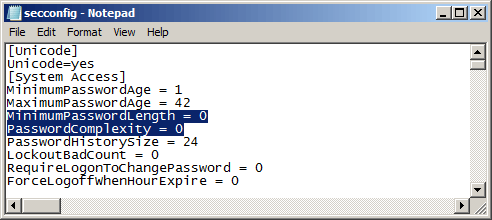
- Now you can view and edit all of the relevant policies as shown
below. Here we'll disable the password complexity policy, so replace
PasswordComplexity = 1 to PasswordComplexity = 0, and change the value of MinimumPasswordLength to 0.

- When done, save your changes. To load the edited file as your new policy configuration, use the following command:
secedit.exe /configure /db %windir%\securitynew.sdb /cfg C:\secconfig.cfg /areas SECURITYPOLICY

- The new password policy will apply to all password changes and new
password. After disabling the password complexity policy, you should be
able to change Windows account password to whatever you like.


